In This Topic
The fill object specifies the filling used for painting the area of a shape. The framework provides several types of fill objects that let you use solid colors, gradients, hatches and images to fill visual elements. All fill types are derived from the abstract base type NFill which is derived from NAttribute. Following is a list of the supported fill types:
Solid Color Fill
Solid Color Fill (represented by NColorFill) is the most common type of filling – it specifies that the target area is filled with a certain solid color. The following code creates an orange color fill:
| Creating a Solid Color Fill |
Copy Code
|
| NColorFill colorFill = new NColorFill(NColor.Orange); |
The color of an existing color fill can be obtained or changed using the Color property of the object, for example:
| Setting the Color property |
Copy Code
|
| colorFill.Color = NColor.CornflowerBlue; |
Linear Gradient Fill
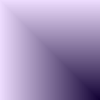
Linear Gradient Fill (represented by NLinearGradientFill) paints the target area with a linear gradient. The gradient is defined by a set of gradient stops placed along a line called gradient axis. Each gradient stop is comprised of a color and a value that specifies the gradient stop’s position on the gradient axis. The position value is in the range [0.0, 1.0]. The color of an arbitrary point on the gradient axis is interpolated from the colors of its surrounding gradient stops. The same color spreads in the direction perpendicular to the gradient axis.
The following code creates a linear gradient fill:
| Creating a Linear Gradient Fill |
Copy Code
|
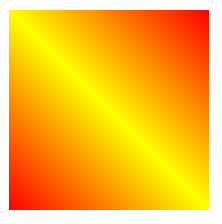
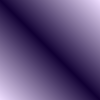
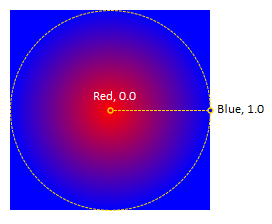
| NLinearGradientFill linearGradient = new NLinearGradientFill(new NAngle(45, NUnit.Degree), NColor.Red, NColor.Blue); |
The created gradient has two gradient stops - red at position 0.0 and blue at position 1.0. The slope of the gradient axis is 45 degrees.
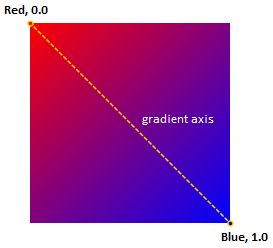
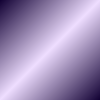
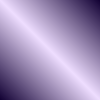
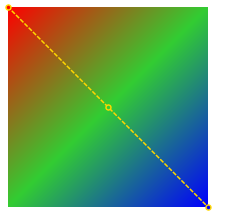
Gradient stops can be added to an existing gradient using the Add method of the GradientStops collection. The following code adds a lime-green gradient stop at position 0.5 on the gradient axis (i.e. in the middle between the red and the blue gradient stops):
| Adding a Gradient Stop |
Copy Code
|
| linearGradient.GradientStops.Add(new NGradientStop(0.5f, NColor.LimeGreen)); |
The image below displays the resulting gradient:
Mapping Modes
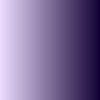
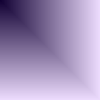
By default the gradient is stretched to fill the target bounding box. If the target bounding box is not a perfect square, the gradient is scaled with different factors along the X and the Y dimensions. As a result the actual slope of the gradient axis will differ from the specified one (unless the specified slope is a multiple of 90 degrees).
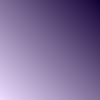
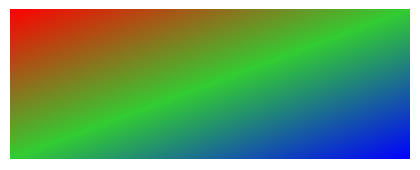
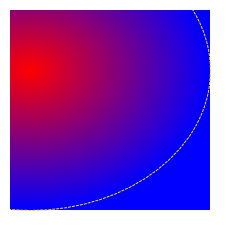
The following experiment demonstrates the effect of gradient scaling – we apply the gradient that we have created to a rectangle with dimensions Width=400, Height=150. The gradient looks stretched in width and the slope of the gradient axis is clearly not 45 degrees:
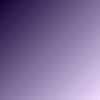
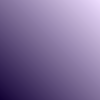
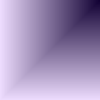
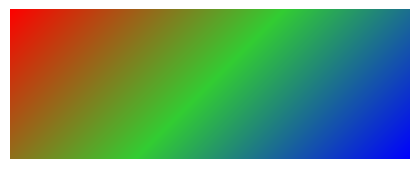
To make the slope of the gradient axis invariant of the target shape’s bounding box, you have to set the mapping mode of the gradient to ENGradientMappingMode.ZoomToFill:
| Changing the Mapping Mode |
Copy Code
|
| linearGradient.MappingMode = ENGradientMappingMode.ZoomToFill; |
The image below displays the effect of this change:
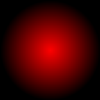
Radial Gradient Fill
Radial Gradient Fill (represented by NRadialGradientFill) paints the target area with a radial gradient. Similarly to the linear gradient, the radial gradient is defined by a set of gradient stops, each one comprised of a color and a position value. The gradient stops are placed along lines that radiate from a single point (focus point) towards a circle. The position value is in the range [0.0, 1.0], where 0.0 is the position of the focus point and 1.0 is the position of the circle. The color of an arbitrary point on a radial line is interpolated from the colors of its surrounding gradient stops.
The following code creates a radial gradient fill:
| Creating a Radial Gradient Fill |
Copy Code
|
| NRadialGradientFill radialGradient = new NRadialGradientFill(0.5f, 0.5f, NColor.Red, NColor.Blue); |
The created gradient has two gradient stops - red at position 0.0 and blue at position 1.0. The center of the circle is positioned at coordinates X=0.5, Y=0.5 which denotes the center of the target area’s bounding box.
The circle’s center can be moved around the target bounding box using the CenterX and CenterY properties. The coordinates of the center point are relative to the target bounding box. The top-left point is specified with coordinates [0, 0] and the bottom-right is at [1, 1]. The center point cannot be positioned outside the target bounding box.
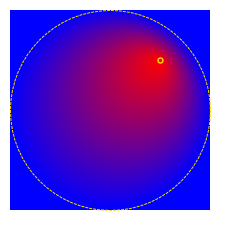
The following code sets the center point near the top-left corner of the bounding box:
| Setting the Gradient Center Point |
Copy Code
|
radialGradient.CenterX = 0.1f;
radialGradient.CenterY = 0.3f; |
As a result the gradient circle becomes an ellipse that touches the right and bottom sides of the bounding box from inside, as displayed in the following image:
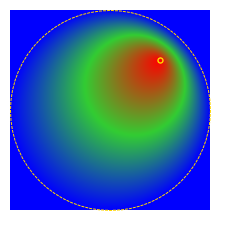
The gradient’s focus point moves with the center point, but can be displaced using the FocusFactorX and FocusFactorY properties. The coordinates of the focus point are relative to the gradient’s center point. The following code sets the gradient center point back in the middle of the bounding box and offsets the focus point:
| Setting the Gradient Focus Point |
Copy Code
|
|
radialGradient.CenterX = 0.5f;
radialGradient.CenterY = 0.5f;
radialGradient.FocusFactorX = 0.5f;
radialGradient.FocusFactorY = -0.5f;
|
The focus point is shifted to the right and upwards from the center point, as displayed in the image below:
Gradient stops can be added to an existing gradient using the Add method of the GradientStops collection. The following code adds a lime-green gradient stop between the red and the blue gradient stops:
| Adding a Gradient Stop |
Copy Code
|
| radialGradient.GradientStops.Add(new NGradientStop(0.5f, NColor.LimeGreen)); |
The image below displays the resulting gradient:
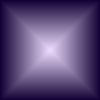
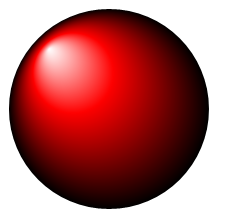
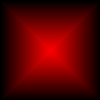
A common use case for radial gradients is the simulation of lighting effects for oval shapes. Such effects can be achieved with a gradient with 3 gradient stops and offset focus point, like the following:
| Creating a Ligthning Effect with a Radial Gradient |
Copy Code
|
NRadialGradientFill radialGradient = new NRadialGradientFill();
radialGradient.GradientStops.Add(new NGradientStop(0.0f, NColor.White));
radialGradient.GradientStops.Add(new NGradientStop(0.4f, NColor.Red));
radialGradient.GradientStops.Add(new NGradientStop(1.0f, NColor.Black));
radialGradient.CenterX = 0.5f;
radialGradient.CenterY = 0.5f;
radialGradient.FocusFactorX = -0.6f;
radialGradient.FocusFactorY = -0.6f; |
The image below displays the resulting gradient (applied on a circle):
Mapping Modes
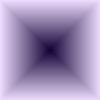
Similarly to the linear gradient, the radial gradient’s default mapping mode is ENGradientMappingMode.Stretch. In this mode the gradient can be scaled disproportionately, which causes the gradient circle to be squashed into an ellipse:
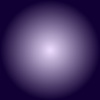
To avoid disproportionate scaling, you have to set the mapping mode of the gradient to ENGradientMappingMode.ZoomToFill.
| Changing the Mapping Mode |
Copy Code
|
| linearGradient.MappingMode = ENGradientMappingMode.ZoomToFill; |
The image below displays the effect of this change:

In this mode the radius of the gradient circle is equal to the longest of the distances between the gradient center point and the corners of the target bounding box.
Advanced Gradient Fill
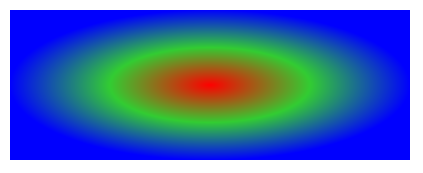
Advanced Gradient Fill (represented by NAdvancedGradientFill) is a gradient comprised of a background color and a set of 2D color-emitting points (or sources). The gradient is produced by blending the colors of the sources, according to their location, intensity and shape.
The following code creates an advanced gradient fill with black background and three gradient points:
| Creating an Advanced Gradient Fill |
Copy Code
|
NAdvancedGradientFill gradient = new NAdvancedGradientFill();
gradient.BackgroundColor = NColor.Black;
gradient.Points.Add(new NAdvancedGradientPoint(NColor.Crimson, NAngle.Zero, 0.87f, 0.29f, 0.92f, ENAdvancedGradientPointShape.Circle));
gradient.Points.Add(new NAdvancedGradientPoint(NColor.DarkBlue, NAngle.Zero, 0.53f, 0.82f, 0.81f, ENAdvancedGradientPointShape.Circle));
gradient.Points.Add(new NAdvancedGradientPoint(NColor.LavenderBlush, NAngle.Zero, 0.16f, 0.17f, 1, ENAdvancedGradientPointShape.Circle)); |
The image below displays the resulting gradient (applied on a square):
The following table lists the available shapes for advanced gradient points:
| Circle |
 |
| Line (can be rotated) |
 |
| Square (can be rotated) |
 |
Stock Gradient Fill
Image Fill
Image Fill (represented by NImageFill) fills the interior of the target shape with a raster image. The NImageFill must be linked to an NImage object that acts as a source for the image data. The following code creates an image fill using a local file as an image source:
| Creating an Image Fill |
Copy Code
|
NImage image = new NImage(@"D:\flower.png");
NImageFill imageFill = new NImageFill(image); |
By default the image is fitted within the target bounding box so that the box may not be fully covered, but the original image’s aspect ratio is preserved. There are many other options for mapping the image onto the target area (like stretching, fitting, tiling, etc). These options are common for all fill types that are based on raster images and are described in detail in the Texture Mapping topic.
Hatch Fill
See Also