In This Topic
Tables allow you to arrange data grouped into rows and columns. In Nevron Text DOM each table is represented as a collection of rows and columns, where each row must hold the same number of cells as the number of columns specified in the columns collection. The following sections discuss how to work with tables:
Creating a Table
You create a table by creating an instance of the NTable class with the specified number of rows / columns. For example:
| Creating a Table |
Copy Code
|
// create table
NTable table = new NTable();
table.BorderThickness = new NMargins(1);
table.Border = NBorder.CreateFilledBorder(NColor.Black);
table.TableBorderMode = ENTableBorderMode.Collapse;

// add columns
NTableColumn column1 = new NTableColumn();
table.Columns.Add(column1);

NTableColumn column2 = new NTableColumn();
table.Columns.Add(column2);

// create the first row
NTableRow row1 = new NTableRow();

// add cells
NTableCell cell11 = new NTableCell();
cell11.BackgroundFill = new NColorFill(ENNamedColor.Gray);
cell11.Blocks.Add(new NParagraph("Value"));
row1.Cells.Add(cell11);

NTableCell cell12 = new NTableCell();
cell12.BackgroundFill = new NColorFill(ENNamedColor.Gray);
cell12.Blocks.Add(new NParagraph("Description"));
row1.Cells.Add(cell12);

table.Rows.Add(row1);

// create the second row
NTableRow row2 = new NTableRow();

// add cells
NTableCell cell21 = new NTableCell();
cell21.Blocks.Add(new NParagraph("10"));
row2.Cells.Add(cell21);

NTableCell cell22 = new NTableCell();
cell22.Blocks.Add(new NParagraph("Cups of Coffee"));
row2.Cells.Add(cell22);

table.Rows.Add(row2);

section.Blocks.Add(table);
|
This code results in the following table:
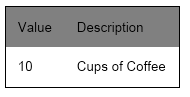
Table Cell Spacing
The tables in Nevron Text can work in two modes - with collapsed and expanded table cell margins. The following two pictures show this:
Table With Collapsed Cell Margins and Spacing
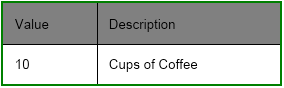
Table With Expanded Cell Margins and Horizontal Spacing 10 dips and Vertical Spacing 20 dips
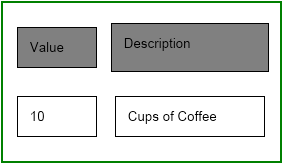
Notice how the second table "Description" cell is larger from value - this is because this cell has no applied margins and uses only the specified horizontal / vertical spacing between cells.
The mode in which the table operates is specified from the AllowSpacingBetweenCells property:
| Setting Table Cell Spacing |
Copy Code
|
table.AllowSpacingBetweenCells = true;
table.TableCellHorizontalSpacing = 10;
table.TableCellVerticalSpacing = 20;
|
The following table shows how the table layout acts when the value of AllowSpacingBetweenCells is set to true or false:
| AllowSpacingBetweenCells |
Description |
| True |
The margins of each cell are regarded. TableCellHorizontalSpacing specifies an additional distance to be added between horizontally adjacent cells or from the left and right table edges. Similarly, TableCellVerticalSpacing specifies an additional distance to be added between vertically adjacent cells or from the top and bottom table edges. |
| False |
The values of cell margins, TableCellHorizontalSpacing, and TableCellVerticalSpacing are discarded. All cells are layout adjacent to each other. In case two adjacent cells have borders the following rules apply:
1. If the border width of one of the cells is wider then this border is drawn and the other one is ignored.
2. If the border widths are equal then left / top border sides take priority over right / bottom cell sides.
The same rules apply for cells that have a common border side with the table.
|
Master Row and Column Cells
By default when you insert cells inside table rows they will occupy only one cell in the table grid. In many cases, you may want to have cells that span several rows or columns. This is achieved using the RowSpan and ColSpan properties of the cell. The following example shows how to create a simple table with column and row master cells:
| Setting Table Preferred Width |
Copy Code
|
NSection section = new NSection(); // create table
NTable table = new NTable();
table.AllowSpacingBetweenCells = false;

// add columns
NTableColumn column1 = new NTableColumn();
table.Columns.Add(column1);

NTableColumn column2 = new NTableColumn();
table.Columns.Add(column2);

NTableColumn column3 = new NTableColumn();
table.Columns.Add(column3);

// create the first row
NTableRow row1 = new NTableRow();
row1.Cells.Add(CreatEmptyCell());

NTableCell colMasterCell = CreateCell("Columns", ENNamedColor.Red);
colMasterCell.ColSpan = Int32.MaxValue;
row1.Cells.Add(colMasterCell);

row1.Cells.Add(CreateCell("Overlapped", ENNamedColor.White));

table.Rows.Add(row1);

// create the second row
NTableRow row2 = new NTableRow();

// add cells
NTableCell rowMasterCell = CreateCell("Rows", ENNamedColor.Green);
rowMasterCell.RowSpan = Int32.MaxValue;
row2.Cells.Add(rowMasterCell);
row2.Cells.Add(CreateCell("Value", ENNamedColor.Gray));
row2.Cells.Add(CreateCell("Description", ENNamedColor.Gray));

table.Rows.Add(row2);

// create the third row
NTableRow row3 = new NTableRow();

// add cells
row3.Cells.Add(CreateCell("Overlapped", ENNamedColor.Gray));
row3.Cells.Add(CreateCell("10", ENNamedColor.White));
row3.Cells.Add(CreateCell("Cups of Coffee", ENNamedColor.White));

table.Rows.Add(row3);

section.Blocks.Add(table);

// ...

private NTableCell CreatEmptyCell()
{
// add cells
NTableCell cell = new NTableCell();
cell.Blocks.Add(new NParagraph());

return cell;
}

private NTableCell CreateCell(string content, ENNamedColor backgroundColor)
{
// add cells
NTableCell cell = new NTableCell();
cell.BackgroundFill = new NColorFill(backgroundColor);
cell.Blocks.Add(new NParagraph(content));
cell.Border = NBorder.CreateFilledBorder(NColor.Black);
cell.BorderThickness = new NMargins(1);
return cell;
}
|
The above line of code results in the following table:
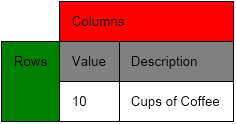
It is safe to specify values larger than the actual column / row count in the table. The used values of the RowSpan and ColSpan properties will be clamped to the number of rows / columns present in the table. This allows you to create row / column master cells that occupy the full number of rows / columns in the table. In the example above this feature is used to create master cells that span any columns / rows added additionally to the table.
Cell Vertical Alignment
By default all cells have top alignment, meaning that content is layout starting from the top of the cells downwards. In some cases, this is not the desired behavior. For example, consider the following table:
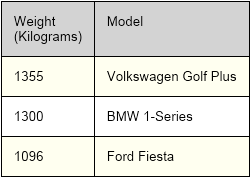
Notice that the "Model" text is displayed somewhat detached from the list of models that follow. In such cases you can consider to alter the cell VerticalAlignment property. The following table lists the available options:
| ENVAlign |
Description |
| Top |
The content of the cell is layout from the top of the cell. This is the default |
| Center |
The content of the cell is centered inside the cell. If the control uses paging and the cell spans two or more pages or columns then the following rules apply:
1. If the cell content can be accommodated in the first page / column spanned by the cell then the cell content is centered inside the cell on that page / column.
2. Otherwise the cell is layout as if the vertical alignment is set to top.
|
| Bottom |
The content of the cell is placed at the bottom of the cell. If the control uses paging and the cell spans two or more pages or columns then the following rules apply:
1. If the cell content can be accommodated in the first page / column spanned by the cell then the cell content is placed at the bottom of the cell on that page / column.
2. Otherwise the cell is layout as if the vertical alignment is set to top.
|
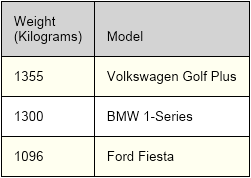
The following image shows the effect of vertical align bottom applied to the cells in the first row of the table:
See Also