Nevron Open Vision comes with extensive support for the Visual Studio WPF designer. During the installation of NOV, most of the NOV widgets get registered in the Visual Studio toolbox and you can use it to drag and drop NOV controls to a window. You can then position, resize and layout the NOV controls in your window in the same way you position, resize and layout other WPF controls.
To edit the properties of a NOV control you should use the smart tags provided for it. They open when you click the smart tag icon placed at the top right corner of the control. The smart tag icon appears when you select the control in the designer either by clicking it or by dragging a rectangular selection over it.
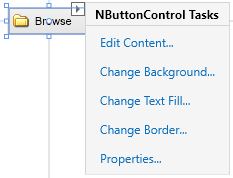
The Properties command shows a dialog that contains most of the properties of the NOV widget embedded in the control and lets you review and change them. The same dialog also opens if you click the button with the three dots ("...") for the Widget property value in the Visual Studio's properties window.
The same commands are also available as context menu items when you right click the control in the designer, so you can use this approach if you prefer.