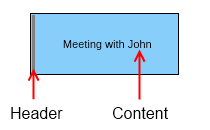
The category affects the background fill of the whole appointment, which by default is light sky blue color fill and the time marker affects the fill of the header, which is by default gray color fill. You can easily add additional categories and time markers or remove some of the default ones by modifying the Categories and TimeMarkers collection of the schedule respectively.
Categories are represented by the NCategory class and time markers - by the NTimeMarker class, which both provide constructors with 4 parameters, you can use to create appointment tags by specifying:
- The name of the tag.
- The fill of the tag.
- The highlighted fill of the tag, which specifies the fill of the tag when the mouse pointer is over the appointment.
- The selected fill of the tag, which specifies the fill of the tag when the appointment is selected.
The following piece of code demonstrates how to create an appointment, assign a category and a time marker to it and add it to a schedule:
| Assign category and time marker |
Copy Code
|
|---|---|
DateTime today = DateTime.Today; NAppointment appointment = new NAppointment("Meeting with John", today.AddHours(8), today.AddHours(10)); appointment.Category = NLoc.Get("Orange"); appointment.TimeMarker = NLoc.Get("Busy"); schedule.Appointments.Add(appointment); |
|
It is best to use NLoc.Get when dealing with appointment tag names, in order to make your application localizable. For more information about localization, check out the Localization Overview topic.