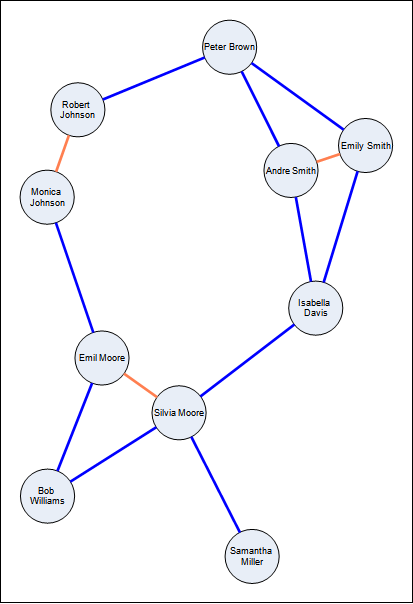
The spring layout is represented by the NSpringLayout class. It is a classical implementation of a force directed layout, with spring and electrical forces. It allows for many per vertex and per edge settings, which can seamlessly reflect the nature of the graph.
In spring layouts, graph vertices are treated as electrically charged particles, which repel each other. The electrical force aims to ensure that vertices should not be too close to each other. The parameters of the electrical force are controlled by an instance of the NElectricalForce class, accessible from the ElectricalForce property.
Graph edges are treated as springs. Springs aim to ensure that the distance between adjacent vertices is approximately equal to the spring length. The parameters of the spring force are controlled by an instance of the NSpringForce class, accessible from the SpringForce property.
The following image illustrates the result of the spring layout:

figure 1. Spring layout used to display a simple social network. Red edges are family relations. Blue edges are friend relations.
In practice the spring layout is used when the graph edges should be displayed with irregular length (e.g. display more related nodes closer together). If this is not the requirement we suggest that you use the Symmetrical layout, which gives better results for symmetrical graph drawings.
As described in the Force Directed Layouts topic, the spring force supports per edge spring lengths and stiffness. That is why the most common tuning of the spring layout is the adjustment of the spring lengths and spring stiffness for each pair of connected vertices (that is for each edge).
In NOV Diagram for .NET this is done by specifying the SpringStiffness and SpringLength properties of the layout data for each 1D shape. For example:
| C# |
Copy Code
|
// connector 1 and connector 2 have different spring stiffness and length
// the vertices connected by connector2 will be closer and more stiffly together
connector1.LayoutData.SpringStiffness = 1;
connector1.LayoutData.SpringLength = 200;

connector2.LayoutData.SpringStiffness = 2;
connector2.LayoutData.SpringLength = 100;
|
| Visual Basic |
Copy Code
|
' connector 1 and connector 2 have different spring stiffness and length
' the vertices connected by connector2 will be closer and more stiffly together
connector1.LayoutData.SpringStiffness = 1
connector1.LayoutData.SpringLength = 200

connector2.LayoutData.SpringStiffness = 2
connector2.LayoutData.SpringLength = 100
|
Edges for which you have not explicitly specified stiffness or length will use the layout defaults, which are specified by the spring force SpringStiffness and SpringLength properties.

