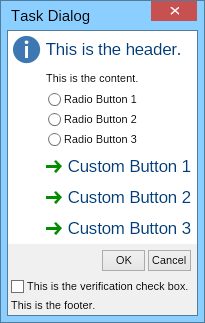
A task dialog is a dialog box that can be used to display information and receive input from the user. It's similar to a message box but can contain many additional elements. All of these elements are optional. The following image shows the elements a task dialog can consist of:

To create a task dialog you should call the static Create method of the NTaskDialog class:
| Create Task Dialog |
Copy Code
|
NTaskDialog taskDialog = NTaskDialog.Create(OwnerWindow);
|
The task dialog header is placed at the top of the task dialog and consists of an icon (optional) and content, which is usually a text placed in an NTaskDialogHeaderLabel. The icon can be one of the values of the ENMessageBoxIcon enumeration. The task dialog header is represented by the NTaskDialogHeader class and is exposed through the Header property of the NTaskDialog class.
The content of the task dialog is placed below the header and can be any widget. The following piece of code demonstrates how to create the header and the content of the task dialog from the beginning of this topic:
| Header and Content |
Copy Code
|
taskDialog.Header = new NTaskDialogHeader(ENMessageBoxIcon.Information, "This is the header.");
taskDialog.Content = new NLabel("This is the content.");
|
Below the content, the task dialog may have some radio buttons. They are exposed by the RadioButtonGroup property of the NTaskDialog class.
| Radio Buttons |
Copy Code
|
taskDialog.RadioButtonGroup = new NTaskDialogRadioButtonGroup("Radio Button 1",
    "Radio Button 2", "Radio Button 3");
|
You can get/set the selected radio button index through the SelectedIndex property of the radio button group.
Below the radio buttons, the task dialog can have custom buttons. By default they contain a green right arrow symbol followed by the button title, but they can also have an arbitrary image or a symbol and a description below the title. Task dialog buttons reside in an NTaskDialogCustomButtonCollection and are exposed through the CustomButtons property of the NTaskDialog class. The following code demonstrates how to create some custom buttons:
| Custom Buttons |
Copy Code
|
taskDialog.CustomButtons = new NTaskDialogCustomButtonCollection("Custom Button 1",
    "Custom Button 2", "Custom Button 3");
|
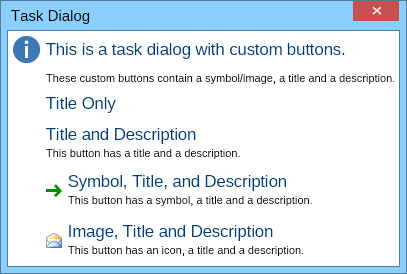
Note that you can easily change the symbol at the left side of a custom button, as well as add a description below the button title. To do so, you should manually create instances of the NTaskDialogCustomButton class using one of the available constructors. The following piece of code demonstrates how to create a task dialog with several such custom buttons:
| Advanced Custom Buttons |
Copy Code
|
NTaskDialog taskDialog = NTaskDialog.Create(OwnerWindow);
taskDialog.Title = "Task Dialog";
taskDialog.Header = new NTaskDialogHeader(ENMessageBoxIcon.Information, "This is a task dialog with custom buttons.");
taskDialog.Content = new NLabel("These custom buttons contain a symbol/image, a title and a description.");

// Create some custom buttons
taskDialog.CustomButtons = new NTaskDialogCustomButtonCollection();
taskDialog.CustomButtons.Add(new NTaskDialogCustomButton("Title Only"));
taskDialog.CustomButtons.Add(new NTaskDialogCustomButton("Title and Description", "This button has a title and a description."));
taskDialog.CustomButtons.Add(new NTaskDialogCustomButton(NTaskDialogCustomButton.CreateDefaultSymbol(),
    "Symbol, Title, and Description", "This button has a symbol, a title and a description."));
taskDialog.CustomButtons.Add(new NTaskDialogCustomButton(NResources.Image__16x16_Mail_png,
    "Image, Title and Description", "This button has an icon, a title and a description."));

// Subscribe to the Closed event and open the task dialog
taskDialog.Closed += OnTaskDialogClosed;
taskDialog.Open();
|
This code will result in the following task dialog:

When the user clicks one of the custom buttons, the task dialog closes and you can obtain the zero-based index of the clicked button through the CustomButtonIndex property of the task dialog.
The NTaskDialogCustomButton can be used anywhere in NOV, not only in a task dialog. This makes it easy to add flat buttons with image, title and description to any NOV widget.
A task dialog can also have some common buttons like "OK", "Cancel", "Yes", "No", etc. These buttons are placed in a button strip below the custom buttons. To add one or more such buttons to a task dialog, you should set the Buttons property to a mask of the ENTaskDialogButton flag enumeration. For example, the following line of code adds an "OK" and a "Cancel" button to a task dialog:
| Common Buttons |
Copy Code
|
taskDialog.Buttons = ENTaskDialogButton.OK | ENTaskDialogButton.Cancel;
|
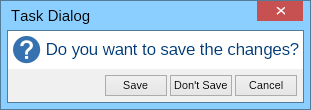
When needed, NOV also lets you change the text of these buttons. To do so, you should get a reference to the stack panel of the button strip the buttons reside in and change the text of their labels:
| Custom Buttons with User Defined Text |
Copy Code
|
NTaskDialog taskDialog = NTaskDialog.Create(OwnerWindow);
taskDialog.Title = "Task Dialog";
taskDialog.Header = new NTaskDialogHeader(ENMessageBoxIcon.Question, "Do you want to save the changes?");
taskDialog.Buttons = ENTaskDialogButton.Yes | ENTaskDialogButton.No | ENTaskDialogButton.Cancel;

// Change the texts of the Yes and No buttons
NStackPanel stack = taskDialog.ButtonStrip.GetPredefinedButtonsStack();
NLabel label = (NLabel)stack[0].GetFirstDescendant(NLabel.NLabelSchema);
label.Text = "Save";

label = (NLabel)stack[1].GetFirstDescendant(NLabel.NLabelSchema);
label.Text = "Don't Save";

// Subscribe to the Closed event and open the task dialog
taskDialog.Closed += OnTaskDialogClosed;
taskDialog.Open();
|
The result of this piece of code will be the following task dialog:

When the user clicks one of the common buttons, the task dialog closes and you can obtain the clicked button through the TaskResult property of the task dialog.
Verification Check Box and Footer
At the bottom of the task dialog are placed the verification check box and the footer. Just like the content, the footer can be any widget. The following code fragment demonstrates how to create the verification check box and the footer of the task dialog at the top of this topic:
| Verification Check Box and Footer |
Copy Code
|
taskDialog.VerificationCheckBox = new NCheckBox("This is the verification check box.");
taskDialog.Footer = new NLabel("This is the footer.");
|
You can get/set whether the verification check box is checked or not through its
Checked property.
To collect the results of the task dialog, you should subscribe to its Closed event prior to calling the Open method to show it. Thus when the dialog closes, your event handler will be called and you will have access to the results of the user input. The following code demonstrates how to collect all the information from the user input available in a task dialog:
| Task Dialog Results |
Copy Code
|
private void OnTaskDialogClosed(NEventArgs arg)
{
    NTaskDialog taskDialog = (NTaskDialog)arg.TargetNode;
    int radioButtonIndex = taskDialog.RadioButtonGroup != null ? taskDialog.RadioButtonGroup.SelectedIndex : -1;
    bool verificationChecked = taskDialog.VerificationCheckBox != null ? taskDialog.VerificationCheckBox.Checked : false;

    StringBuilder sb = new StringBuilder();
    sb.AppendLine("Task result: " + taskDialog.TaskResult.ToString());
    sb.AppendLine("Radio button: " + radioButtonIndex.ToString());
    sb.AppendLine("Custom button: " + taskDialog.CustomButtonIndex.ToString());
    sb.AppendLine("Verification: " + verificationChecked.ToString());
}
|


